Saturday 29 May 2010

Free tools for manipulating PDFs

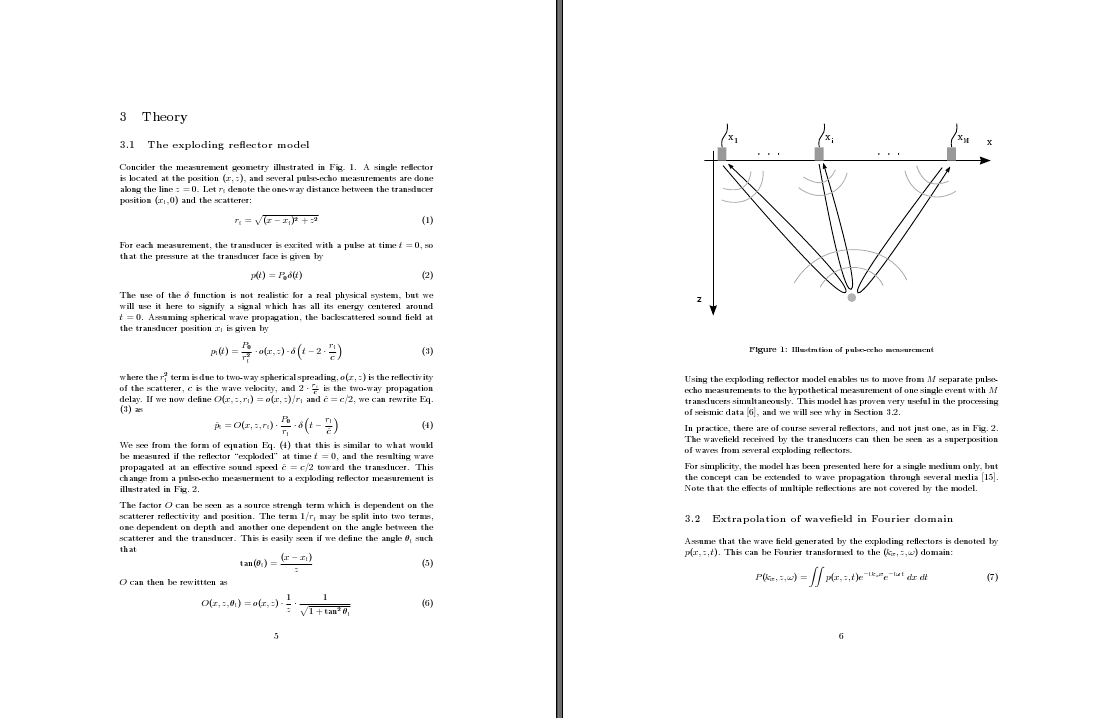
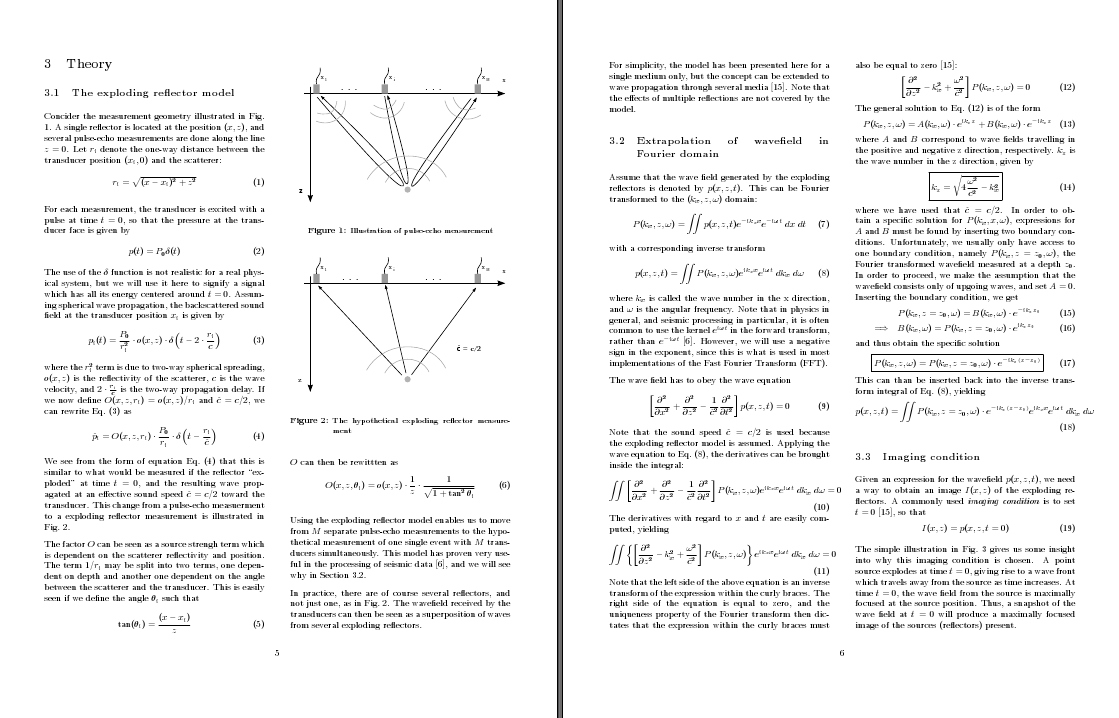
PDF has definitely become the standard digital document format, and I both read and produce a large number of PDF files in my work. Compared to for example Word documents, the advantages are obvious: A PDF file looks the same on any operating system and any document reader. However, most PDF readers do not have support for operations like merging, splitting or rotating PDF files. Many people use expensive software like Adobe Professional to do such things, but there are also freeware alternatives available.

While I was using Windows on my work PC, I used the free PDFill Tools, which have a nice graphical user interface and are really easy to use. However, after switching to Ubuntu, I needed a Linux alternative to PDFill. After some search I concluded that one of the most popular tools is pdftk (PDF ToolKit), developed by Sid Steward. It is a command-line tool available for both Windows, Linux, Mac OS X, FreeBSD and Solaris. As long as you are comfortable with using the command line, pdftk provides a really effective way of doing both simple and more complex manipulations of PDF documents.

A simple example: Merge files 1.pdf and 2.pdf into a combined file 3.pdf:
pdftk 1.pdf 2.pdf cat output 3.pdf

A more complex example: Extract pages 1-7 from one.pdf, pages 1-5 from two.pdf, page 8 from one.pdf, and merge them all together into a combined PDF:
pdftk A=one.pdf B=two.pdf cat A1-7 B1-5 A8 output combined.pdf

These examples only show a fraction of the possible uses - check out the pdftk homepage for several more examples. Also, if you want to dive deep into the world of PDF maniplation, you might want to consider buying Sid's book PDF hacks.

Tuesday 25 May 2010

Switching to two-column layout in LaTeX

The default layout for an article in LaTeX is single-column, with quite large margins. The large margins are quite sensible, as they narrow the width of the column to make it easier for the reader to jump from one line to the next. However, when I write articles, I often include a lot of equations and figures, and these tend to create a lot of white space. The result is a massive number of pages which each has relatively little content, as illustrated by this example:


Switching to two-column layout is surprisingly easy -- just add the "twocolumn" option when declaring the document type, for example:

\documentclass[10pt,twocolumn]{article}

For figures, it is also useful to specify the width of the figure relative to the column width, like this:

\includegraphics[width=0.9\columnwidth]{Figures/figure1}

The result is a page with a lot mote information, which is also easier to read because of the columns are narrower than in the one-column layout. However, the pages also looks a bit crowded:


This is one of many cases where the geometry package comes in handy. Looking at the pages above, it seems that the separation between the columns is a bit too small, especially compared with the outer margins. We include the geometry package and increase both column separation and text width/height:

\usepackage[width = 18cm, height = 22cm, columnsep = 1cm]{geometry}

Note that these parameters are only a few of the parameters that can be set using the geometry package. Consult the documentation for further details. The end result is, in my opinion, quite pleasing compared with the initial one-column layout:


And, lastly, a small but useful detail: If you want a figure or table to span the width of both columns, add an asterisk when declaring the environment:

\begin{figure*}
...
\end{figure*}


If you found this interesting, check out Robert Felty's blog post on the same subject. Also, if you have any other tips concerning one-column versus two-column layouts - please share them here! :-)

Wednesday 12 May 2010

Setting file permissions in linux

File permissions for a file or a directory are grouped after "user" (u), "group" (g) and "other" (o), and permission to read (r), write (w) and execute (x). In your home directory, you are registered as the user of all the files, and by default you have read, write and execute premission to all files.

The file permissions can be seen by typing "ls -l" in the terminal. The permissions are then listed as a string, for example "drwxr-xr-x". This string consists of a "d" plus three groups of "rwx", corresponding to the user, group and others, respectively. The "-" sign indicates "no permission". For the example above, the user has all permissions, while the group and others only have read and execute permissions.

File permissions are set by the "chmod" command. One way to use this command is to add (+) or remove (-) permissions. For example, the following command adds permission for user and group to write and execute "somefile.txt"


chmod ug+wx somefile.txt

The same syntax is used for files and folders. To set permissions for all files and subfolders of a folder, add a "-R" ("recursive") switch. For example,

chmod ugo-w -R SomeFolder

will remove all write permissions for "SomeFolder" and all its contents.

This approach is based on changing the file permissions relative to the way that they were before. The file permissions can also be set "absolutely". It is common to do this by coding r,w and x as numbers 4, 2, and 1. The file permission is then identified by the sum of the numbers, for example "r-x" = 4+1 = 5. For example, to let the user have all permissions while restricting write access for group and others, "rwxr-xr-x" can be translated to 755, and the chmod syntax is as follows:

chmod 755 file.txt

For further information on file permissions and how to change them, consult the Ubuntu Community Documentation.

Monday 10 May 2010

The curse of Matlab NaNs

NaN is a special kind of Matlab value, representing Not-A-Number. This is often returned from a function or operation where the output is not well defined. For example, if you try to interpolate a value outside of the range of x values, the interp1 function returns NaN for this value. The following sample code illustrates this:

x = [1 2];
y = [1 4];
xi = 5;
y = interp1(x,y,xi)

returns y = NaN.

You may not always notice that a variable contains NaN values. For example, let's plot the "peaks" matrix from Matlab as an image:

X = peaks;
imagesc(X)


Now, if we set the middle element equal to NaN, this will show up as a blue spot in the image. This is because Matlab plots NaN elements with the "lowest" colormap color:

X(25,25) = NaN;
imagesc(X)
colorbar


Note here that there is no way of distinguishing a NaN from a valid data value in such an image. However, we can check how many NaN elements there is in a variable:

numberOfNanElements = nnz(isnan(X))

which returns 1. Now, NaN has the unfortunate property that is "taints" all other elements that are affected by it. For example, if we take a 2D Fourier transform of X, all the elements returned by the function are NaN. So,

nnz(isnan(fft2(X)))

returns 2410! One single NaN pixel in the original image makes the entire transform unusable. Although I can understand the logic behind this behavior, it has been (and still is) a frequent source of very frustrating bugs in my work. When debugging, I often check 2D datasets by plotting them as images -- but as we have seen, a few NaN values can easily be present in an image without standing out from the valid data points. So, thinking that the dataset is valid, I continue stepping through the code, only to find that the complete dataset suddenly turns into NaNs. In this situation it is easy to conclude that there is something wrong in the last function used, when the fault really lies in the input data.

I've spent too many hours agonizing over such errors, so here's a tip for everyone that think that NaNs are messing up their code: For all variables that may potentially contain NaNs, set all NaN elements to zero, like this:

X(isnan(X)) = 0;

A zero value may not necessarily be "correct" as such, but it doesn't have the potential of NaNs to destroy the complete dataset. Now, if I could only remember this the next time I encounter "the curse of the NaNs"... ;-)

Monday 3 May 2010

Introduction to Beamer presentations

I just started using Beamer, which is a document class for creating presentations using LaTeX. I installed Beamer in Ubuntu Linux using the Synaptic package manager, and found the user guide located in /usr/share/doc/latex-beamer, along with a set of useful templates. The user guide is massive and although it probably contains everything there is to know about Beamer, I searched the web for some quick introdutions:

A Beamer Quickstart is a very good starting point for Beamer - it both contains the essential "hello world" code for a bare-bones presentation, plus a lot of details on how to customize your presentation.

Sylvia Blaho at my very own University of Tromsø has also made a nice introduction to Beamer, as a Beamer presentation, of course.

Beamer comes with a set of themes and color layouts, and this Beamer Theme Matrix shows examples of every possible combination of these. Very useful for finding your favorite theme. Note that the .sty files for all the themes are located in /usr/share/texmf/tex/latex/beamer/themes.

There are also a lot of people making their own Beamer themes. This webpage has a list of several such themes made, among them the beautiful Torino theme and an unoffcial but really nice theme for Uppsala University.