Thursday, 7 October 2010

Checking which memory banks are used on Linux

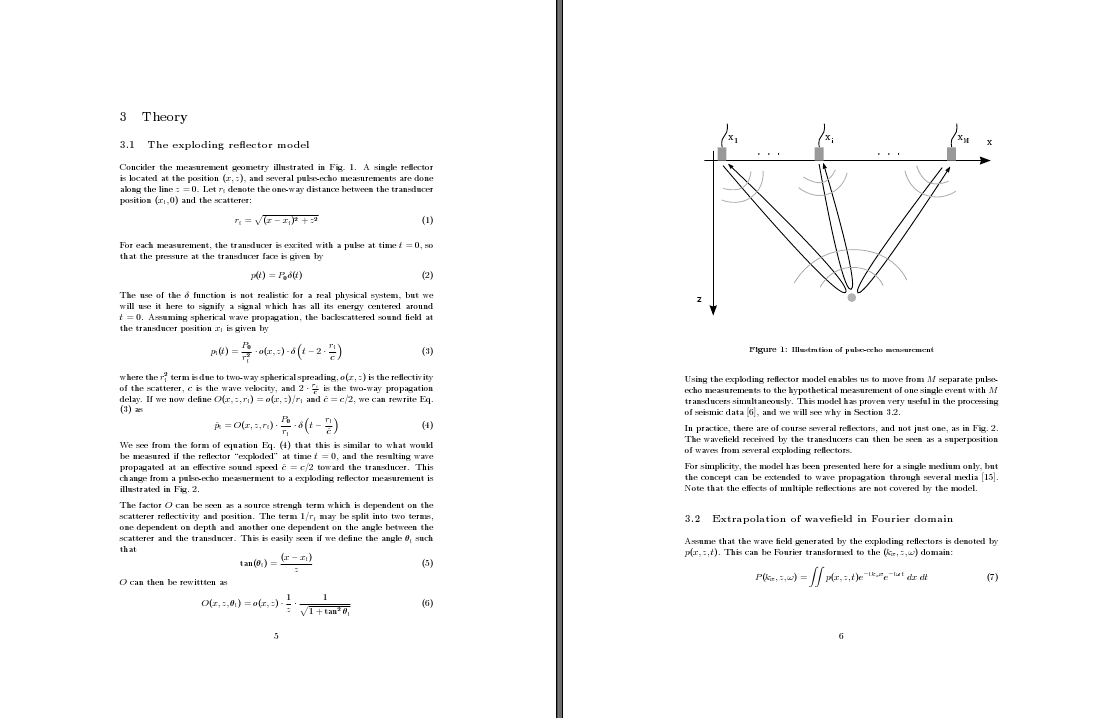
Today, I decided that I want to upgrade from 2 GB to 4 BG memory on my laptop. However, I didn't know how this memory was distributed - was it two 1GB chips, or a single 2 GB chip? Luckily, a colleague of mine found this command:

sudo lshw -c memory

which, among other things, produced these lines:

*-memory
description: System Memory
physical id: 2b
slot: System board or motherboard
size: 2GiB
*-bank:0
description: SODIMM DDR2 Synchronous 667 MHz (1.5 ns)
physical id: 0
slot: DIMM 1
size: 2GiB
width: 64 bits
clock: 667MHz (1.5ns)
*-bank:1
description: SODIMM DDR2 Synchronous 667 MHz (1.5 ns) [empty]
physical id: 1
slot: DIMM 2
clock: 667MHz (1.5ns)


Voila! From this info it's easy to see that memory bank 1 has 2 GB of memory, and bank 2 is empty.

Thursday, 30 September 2010

Solving installation problems with Comsol 4.0a in Ubuntu Linux

Today I decided to install Comsol Multiphysics 4.0a, which is a physics simulation program based on the Finite Element Method (FEM). I'm running Ubuntu Linux 9.10 (Karmic Koala), and the installation procedure should be as simple as this (quoting from the installation manual):

"To start the installation, type the command

sh {drive path}/setup

where {drive path} refers to the mount point of the DVD-ROM
drive on your system, for example, /media/cdrom."

When I insterted the Comsol DVD, it was mounted as "COMSOL40a ". Note that there are some trailing white spaces which don't make any sense. When I tried to run the installation program, I got an error message saying that "/media/COMSOL40a" did not exist. Turns out that the installation program was looking for a mount point directory without any white spaces.

My solution to this was to mount the CD to another folder, to a folder name without trailing white spaces. I didn't know how do this, but I found a simple description at this web site. In the terminal, I typed

sudo mount -t auto /dev/cdrom /media/tmpcd/

to mount the CD to /media/tmpcd. After that, I could run the installation program as instructed, by typing

sh /media/tmpcd/setup

I'm not sure who is to blame for this "bug", Ubuntu or Comsol, but at least I figured out how to work around it. :-)

Tuesday, 28 September 2010

Solving Ubuntu full disk problem related to SBackup

OK, so today I came to my office finding that somehow my Wubi Ubuntu installation had somehow filled up completely. There was absolutely no disk space left, and because of this, the whole system was so slow that it was unusable. Not really realizing how this could have happened, I tried to reboot. The log-in screen now looked different, and there was a warning about power management not being set correctly. When I tried to log in, the screen only blinked, before the log-in screen appeared again.

Getting pretty frustrated at this point, I started looking through forum threads for posts on similar problems. I found several tips on cleaning up a full partition, all of which involved getting into "terminal mode" by pressing Ctrl-Alt-F1 at the login screen. This made me able to browse through different folders, and check the disk usage using the command du, but I still couldn't figure out why the disk had filled up.

Eventually, I found this forum thread which suggested that the backup program that I use, Simple Backup (or SBackup) may have been saving backup files on my laptop's internal hard drive rather than the intended external drive. A blog post by rvdavid confirmed that several people have had this issue.

My external drive is called "Martins Backup", and when it is connected, it is usually mounted to /media/Martins Backup. It turns out that the backup program kept saving files to /media/Martins Backup EVEN WHEN IT WAS NOT CONNECTED (sorry about that), effectively storing them to the internal drive. Investigating this further, I found 20 GB worth of backup files clogging up the system. Luckily, they are all gone now, my Ubuntu system works as usual, and I'm changing my backup program as soon as I find a suitable alternative. Puh! :-)

Thursday, 26 August 2010

Remotely obtaining scientific articles through the university library

The library at my university (University of Tromsø) has access to electronic versions of a massive amount of scientific papers, for example through sciencedirect.com or IEEE Xplore. Anyone on the university network are granted automatic access to the papers on these sites. However, I spend most of my time outside the university network, and therefore I've had to find a way to remotely browse for papers with the library's access.

This could probably be done quite easily using VPN, but unfortunately, I cannot use VPN at my work place. However, the university has a remote desktop service which allows me to log on to a server at the university and use FireFox on that server to browse for papers. In Ubuntu, I use the Terminal Server Client (Applications -> Internet -> Terminal Server Client), enter the server name (mender.student.uit.no) and my university user name and password to connect to the remote desktop (This site at UiO also explains how to do this).

Although the Terminal Server Client has an option for mapping the local drive to the remote server, I was not able to save articles back to my local home area. I'm suspecting that this is due to root access problems. However, I can save the articles to my "home area" on the university net, and transfer them afterwards using SFTP through the twin-panel file explorer Krusader. This site has a short how-to on this. Thus, I can log on to the file server of my university (chandra.student.uit.no) and transfer the articles to my local machine. A bit involved, but it works! :-)

Tuesday, 10 August 2010

Merging several changes into an incomplete svn tree

I have been using Subversion (SVN) for version control of my files for some time now, but recently I was away for half a year without being able to commit changes to the SVN server. In addition, I only save some of the files in my folders, to avoid versioning large binary files. These are some of the things I learned trying to merge all my changes into the incomplete SVN tree:
  • To avoid adding certain files, edit the global-ignores parameter in the svn config file (found under ~/.subversion/ on my Ubuntu installation) to ignore files matching certain patterns, for example *.pdf
  • To update an incomplete folder structure by copying in files from a complete folder structure, use the '-u' switch with the copy command, together with the '-r' switch for recursive copying: cp -u -r compTree inCompTree
  • To check if files or folders in the current folder are versioned (registered in the svn system), use svn status --depth=immediates
  • If you want to restructure the folder tree, it's easier to do this directly in the repository rather than changing the structure of the working copy and then commiting (I used the RabbitVCS repository browser, but it's possible to do via the command line)
  • Finally, it's often better to check out a subfolder of the repository rather than the complete tree - it saves both time and disk space. Example: svn checkout svn://server/Topfolder/Subfolder Subfolder will only check out the "Subfolder" folder and create a local copy.

Saturday, 29 May 2010

Free tools for manipulating PDFs

PDF has definitely become the standard digital document format, and I both read and produce a large number of PDF files in my work. Compared to for example Word documents, the advantages are obvious: A PDF file looks the same on any operating system and any document reader. However, most PDF readers do not have support for operations like merging, splitting or rotating PDF files. Many people use expensive software like Adobe Professional to do such things, but there are also freeware alternatives available.

While I was using Windows on my work PC, I used the free PDFill Tools, which have a nice graphical user interface and are really easy to use. However, after switching to Ubuntu, I needed a Linux alternative to PDFill. After some search I concluded that one of the most popular tools is pdftk (PDF ToolKit), developed by Sid Steward. It is a command-line tool available for both Windows, Linux, Mac OS X, FreeBSD and Solaris. As long as you are comfortable with using the command line, pdftk provides a really effective way of doing both simple and more complex manipulations of PDF documents.

A simple example: Merge files 1.pdf and 2.pdf into a combined file 3.pdf:
pdftk 1.pdf 2.pdf cat output 3.pdf

A more complex example: Extract pages 1-7 from one.pdf, pages 1-5 from two.pdf, page 8 from one.pdf, and merge them all together into a combined PDF:
pdftk A=one.pdf B=two.pdf cat A1-7 B1-5 A8 output combined.pdf

These examples only show a fraction of the possible uses - check out the pdftk homepage for several more examples. Also, if you want to dive deep into the world of PDF maniplation, you might want to consider buying Sid's book PDF hacks.

Tuesday, 25 May 2010

Switching to two-column layout in LaTeX

The default layout for an article in LaTeX is single-column, with quite large margins. The large margins are quite sensible, as they narrow the width of the column to make it easier for the reader to jump from one line to the next. However, when I write articles, I often include a lot of equations and figures, and these tend to create a lot of white space. The result is a massive number of pages which each has relatively little content, as illustrated by this example:


Switching to two-column layout is surprisingly easy -- just add the "twocolumn" option when declaring the document type, for example:

\documentclass[10pt,twocolumn]{article}

For figures, it is also useful to specify the width of the figure relative to the column width, like this:

\includegraphics[width=0.9\columnwidth]{Figures/figure1}

The result is a page with a lot mote information, which is also easier to read because of the columns are narrower than in the one-column layout. However, the pages also looks a bit crowded:


This is one of many cases where the geometry package comes in handy. Looking at the pages above, it seems that the separation between the columns is a bit too small, especially compared with the outer margins. We include the geometry package and increase both column separation and text width/height:

\usepackage[width = 18cm, height = 22cm, columnsep = 1cm]{geometry}

Note that these parameters are only a few of the parameters that can be set using the geometry package. Consult the documentation for further details. The end result is, in my opinion, quite pleasing compared with the initial one-column layout:


And, lastly, a small but useful detail: If you want a figure or table to span the width of both columns, add an asterisk when declaring the environment:

\begin{figure*}
...
\end{figure*}


If you found this interesting, check out Robert Felty's blog post on the same subject. Also, if you have any other tips concerning one-column versus two-column layouts - please share them here! :-)